Bluetooth BLE with C2541 or nRF chipsets
<-- Home
Strings of data can be transferred between
computers by wire or by air.
Serial communication is an long proven solid method
to send small amounts of data, like instructions or records from measurement on
a remote device.
An universal asynchronous
receiver-transmitter (UART) is a computer hardware device for asynchronous
serial communication in which the data format and transmission speeds are
configurable as Wikipedia describes it.
The serial port on a PC can be connected by wire to an
other PC's serial port.
If from both wires the TX (transmit) pin from one PC is connected
to the RX (receive) pin of the other PC, the PC's can communicate.
Both PC's must be set to the same transmission speed, the baud rate. The baud
rate is how many bits per second are send over the wires.
A standard communication speed is 9600 baud = 9600 bits
per second. In this string of bits
some are control bits. 9600 baud is roughly 1000 bytes per second.
A baud rate of
115200 is also a common used speed.
There are several methods that can be used to send
data through the air.
HM-10 Bluetooth modules use a Texas Instruments C2541 chip for the decoding
of the signal to a string of bits.
A HM-10 or similar BLE module, like JDY-23, can be used with Android and Apple
phones. HC-0x modules, like the popular HC-05, can not be used with Apple
devices. Therefore HM-10 modules are a good choice. They are cheap and can be
connected to Arduino or other MCU's
ESP32 and some Arduino MCU's use the Nordic nRF52 chipsets. They are often
integrated in the processor boards together with an WIFI module.
Bluetooth has a range of 10 meters and can be transmitted and received with a
mobile phone.
There are similar serial radio modules, known as HC-12, that has ranges up to 1000
meter. (See an
example here)
Two HC-12 modules can be used instead of a long cable between two devices. They
are easy to operate but you can not use a phone.
A HM-10 or similar BLE module, like JDY-23, can be used with Android and Apple
phones. HC-0x modules, like the popular HC-05, can not be used with Apple
devices. Therefore HM-10 modules are a good choice.
This page describes how to use a phone to communicate
with an Arduino program to send instructions and received results.
A similar program to communicate with the Nordic nRF
chipset with an ESP32 is described here.
Use the Bluetooth HM-10 BLE module to send and receive
messages with an Arduino
|
Communication with Bluetooth modules takes place through the serial pin RX and
TX on the Arduino and the Bluetooth module.
The library Softwareserial.h makes it possible on
older Arduino's to use other pins than the
standard pins 0 and 1 that are also used to upload programs.
ESP32 also have TX1/RX1 and some have even more programmable serial pins.
In the example program pin 6 & 7 can be used.
This is accomplished by the #define BLUETOOTHMOD.
With these instruction in the program
#ifdef BLUETOOTHMOD
#include <SoftwareSerial.h>
#endif //BLUETOOTHMOD
Code between the #ifdef and #endif are compiled in the program or not if
BLUETOOTHMOD is not defined
One can spare the two pin 6&7 and connect the BLE
module to pin 0&1, the serial port pins of Arduino's. This saves a
library and some code that has to be used to read and write to pins 6&7.
But ... the BLE module interferes the upload of programs to the Arduino
and the module must be disconnect before every upload.
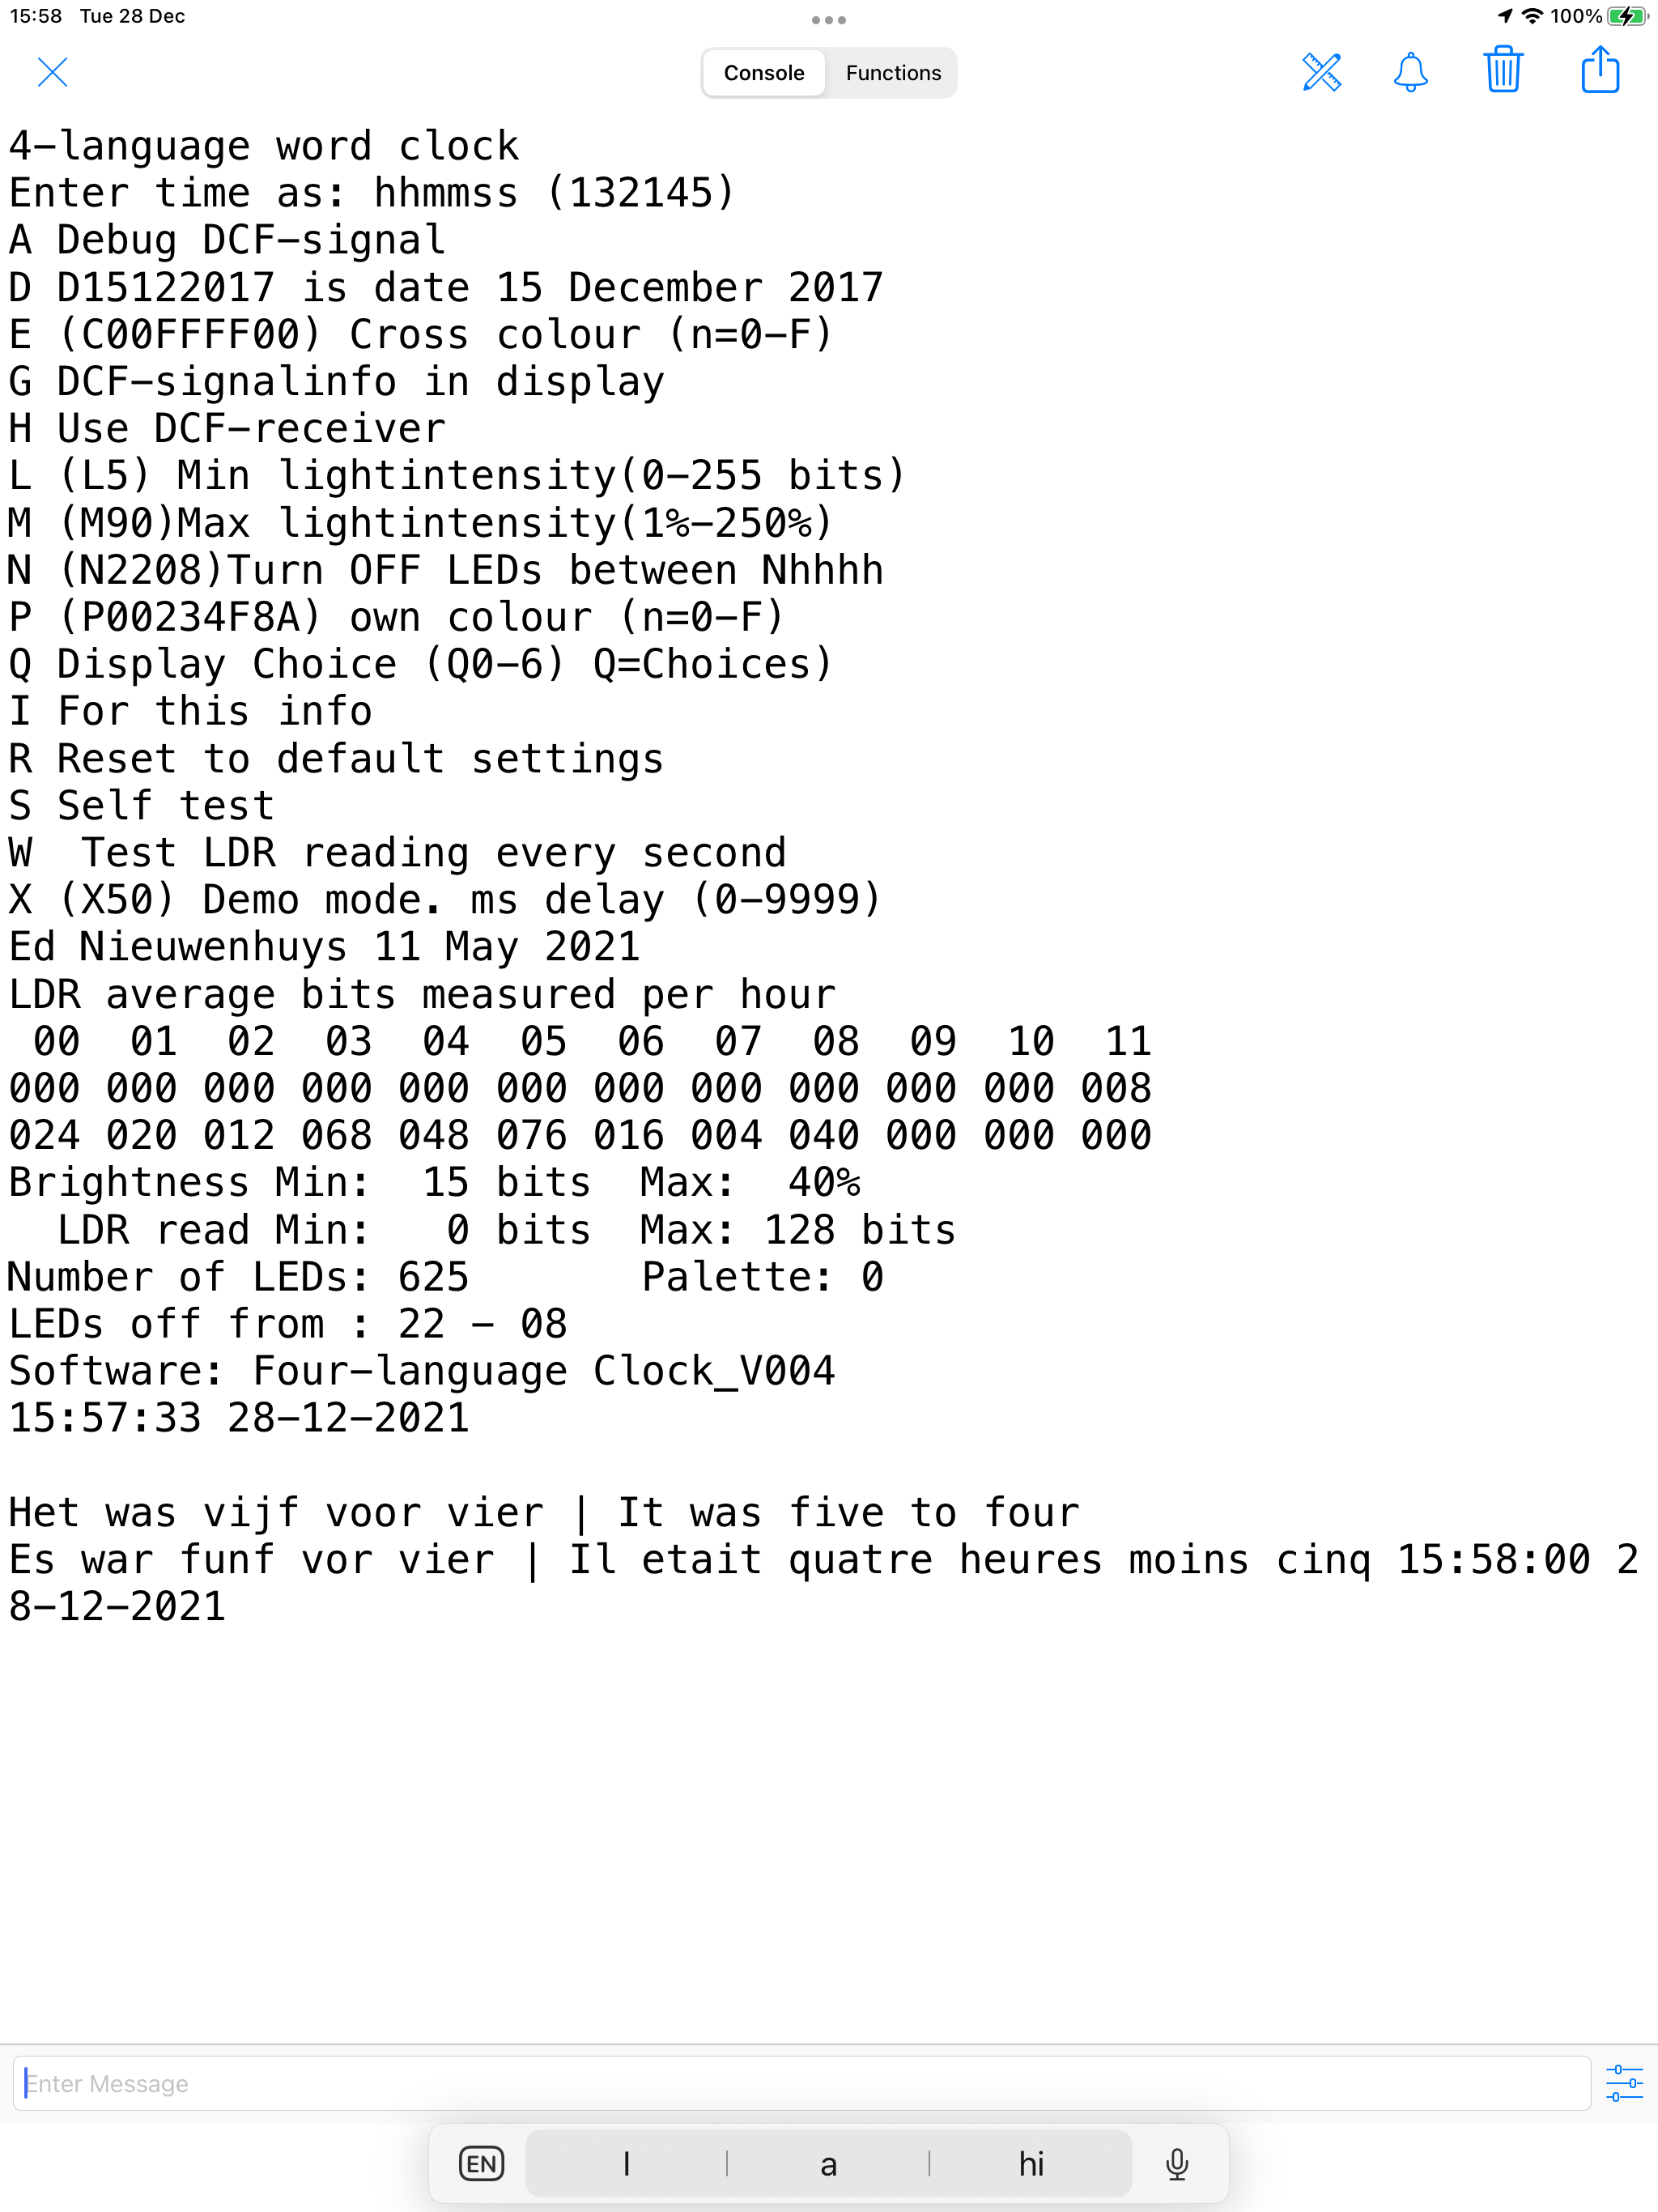
The Arduino can be connected with an USB cable to a PC and
controlled with a serial terminal program like the one in the Arduino
IDE or Termite.
With a serial terminal program one can send commands to the receiver that can
be used in the Arduino program to do something.
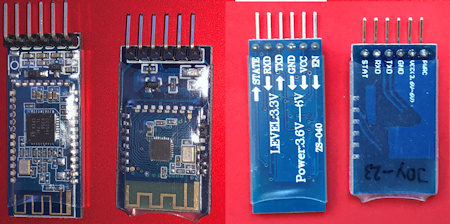
I use letters and digits to do tasks in the program.
In the terminal window the menu from the
Arduino is displayed and commands can be entered in the "Enter message"
field at bottom of that window.
If a BT module is connected to pin 0&1 one can see the data at the same
time in a connected phone
|
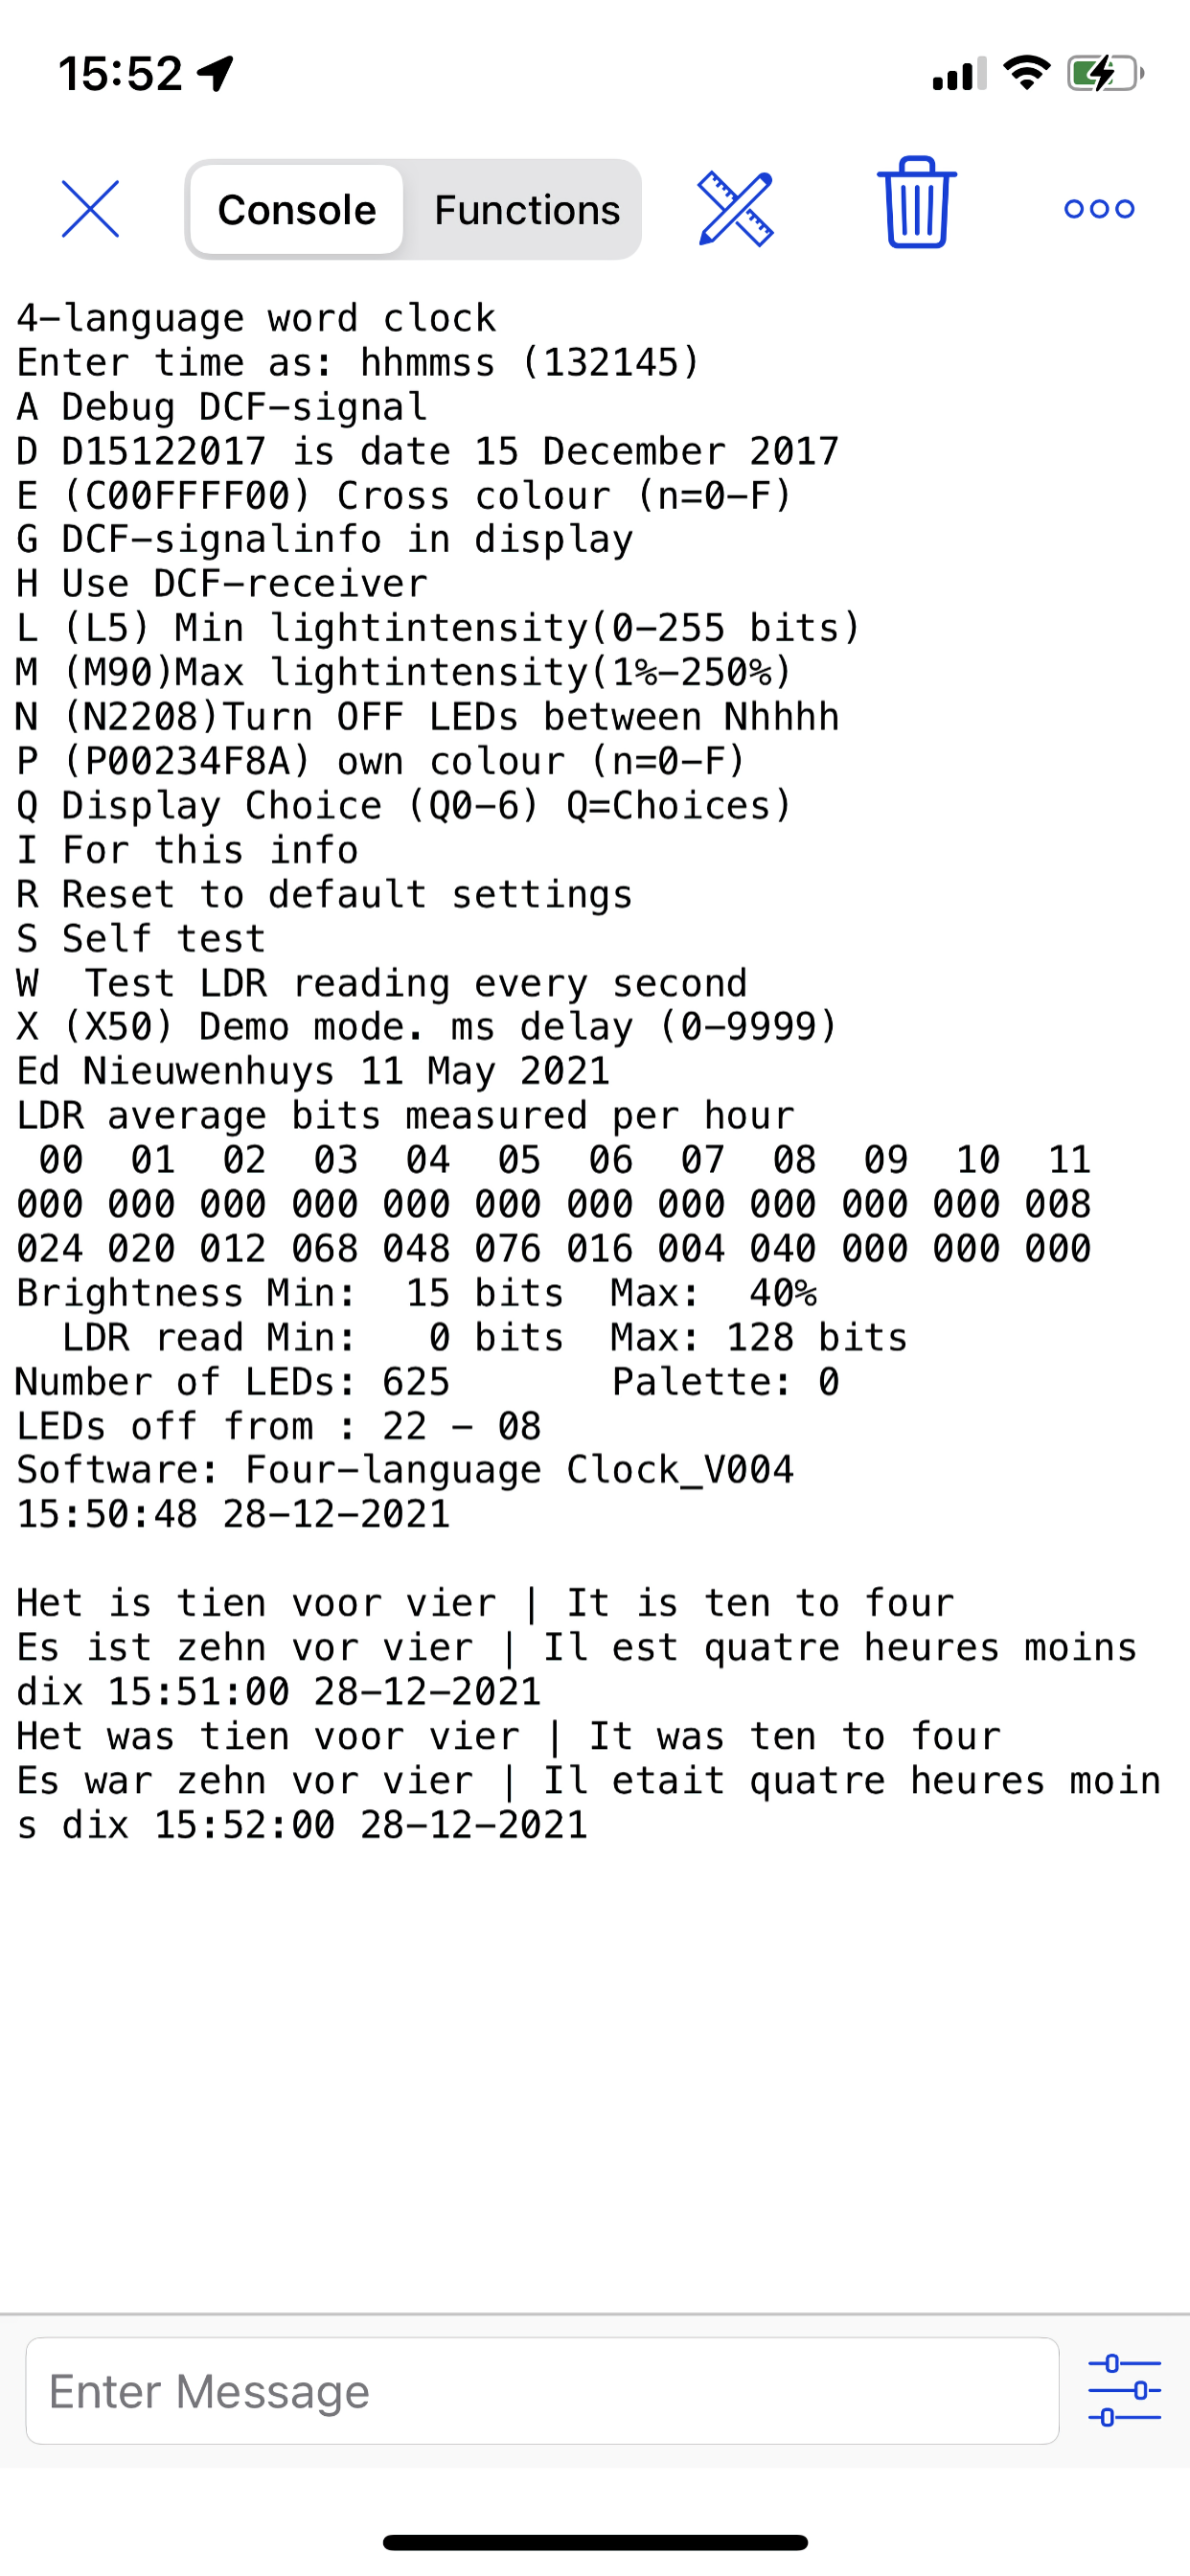 |
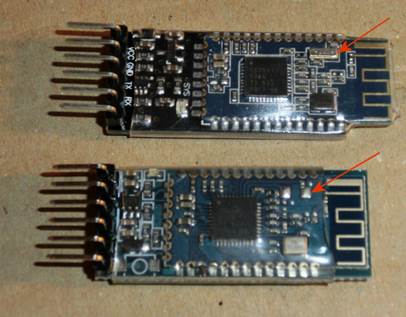
HM-10 left and JDY-23 (2nd) BLE modules |
|
The menu to display in the terminal
The menu is a character array with text to be displayed.
In this example a menu line can not be longer than 41 characters.
//0 1 2 3 4 5
//12345678901234567890123456789012345678901234567890
char menu[][42] = { // menu[][nn] nn is largest length
of sentence in the menu
"Menu",
"A Action A",
"D Enter Date DDDMMYYYY (D25122021",
"I For this info menu",
"R Action R",
"T Enter time as THHMMSS (T071500)",
"Jan 2022" };
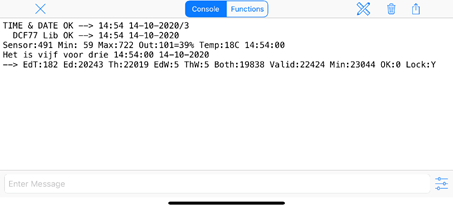
The subroutine below translates the received command line to an action.
void ReworkInputString(String InputString)
{
 InputString.trim();                                                                          // Remove trailing spaces
 if (InputString.length()>10) return;                                                         // If string is too long for some reason
 if (InputString[0] > 64 && InputString[0] <123)                                              // If the first charater is a letter
  {
  sprintf(sptext,"**** Wrong entry ****");                                                    // Default message
  Serial.println(InputString);
  switch (InputString[0])
   {
    case 'A':
    case 'a':
            if (InputString.length() == 1)
              {
               sprintf(sptext,"Action A");
              }
             break;
    case 'D':
    case 'd':
            if (InputString.length() == 9 )
             {
              int Day, Month, Year;
              Day   = (byte) SConstrainInt(InputString,1,3,0,31);
              Month = (byte) SConstrainInt(InputString,3,5, 0, 12);
              Year  =        SConstrainInt(InputString,5,9, 2000, 3000);
              sprintf(sptext,"%02d-%02d-%04d",Day, Month, Year);
             }
            break;
    case 'I':
    case 'i':
            if (InputString.length() == 1)
            {
             SWversion();
             sptext[0] = 0;                                                                      // Clear sptext

            }
            break;
    case 'R':
    case 'r':
            if (InputString.length() == 1)
              {
               // Reset();                                                                       // Reset all settings
               Tekstprintln("\n**** Reset to default settings ****");
              }
            break;
    case 'T':
    case 't':
            if(InputString.length() >= 7)  // T125500
              {
              int Hour, Minute, Second ;
              Hour   = (byte) SConstrainInt(InputString,1,3,0,23);
              Minute = (byte) SConstrainInt(InputString,3,5,0,59);
              Second = (byte) SConstrainInt(InputString,5,7,0,59);
              sprintf(sptext,"%02d:%02d:%02d",Hour, Minute, Second);

              }
              break;
     default:
             break;
    }
  }
 Tekstprintln(sptext);
 InputString = "";
}
A working INO file for an Arduino can be found at the
bottom of this page and as file here:
BLEHM-10Menu.ino
There are hardly any apps or programs that can communicate with the HM-10 BLE devices.
Below is one for IOS and one for Android.
If the HM-10 or JDY-23 (C2541 modules are used you need one of apps mentioned
below.
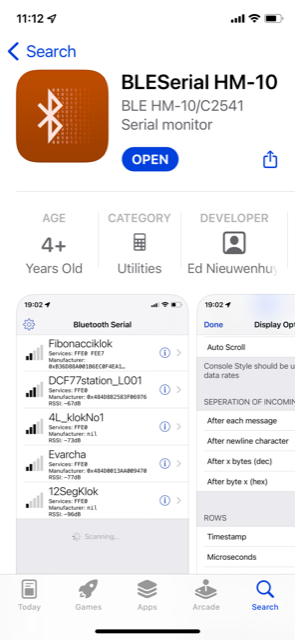
For Apple IOS my free program "BLEserial
HM-10" from the app store can be used.
if the menu program is used in nRF equipped MCU's like the RP2040 Connect or
ESP32 variants use the
free IOS nRF
app.
The priced app BLEserial Pro app.
has more capabilities and connect to both CC25xx and nRF chipsets.
Serial Bluetooth Terminal van Kai Morich works fine as
terminal app with Android.

Connect in the app with your BLE module.
Type a command in the send of enter message box or wait if your program logs
results in the console window.
Change the name of a HM10 BLE with an FTDI

The easiest method to change or program a HM-10 module is using a FTDI
programmer.
Every BLE module can be given a name that it will broadcast and in displayed in
the list of BLE devices in the IOS or Android app.
To change that name do the following:
Connect the 3.3V and GND and TX to RX and RX to TX.
Open an serial monitor like
Termite or de
Arduino Serial monitor and open the serial port
Enter AT in the monitor and OK should show up in the window as response of the
module
AT+NAME followed with the desired name give the module a new broadcasting name.
AT+HELP list the following commands:
********************************************************************
* Command
Description
*
*
---------------------------------------------------------------- *
* AT
Check if the command terminal work normally *
* AT+RESET
Software reboot *
* AT+VERSION
Get firmware, bluetooth, HCI and LMP version *
* AT+HELP
List all the commands
*
* AT+NAME
Get/Set local device name
*
* AT+PIN
Get/Set pin code for pairing
*
* AT+PASS
Get/Set pin code for pairing
*
* AT+BAUD
Get/Set baud rate
*
* AT+LADDR
Get local bluetooth address
*
* AT+ADDR
Get local bluetooth address
*
* AT+DEFAULT Restore
factory default
*
* AT+RENEW
Restore factory default
*
* AT+STATE
Get current state
*
* AT+PWRM
Get/Set power on mode(low power) *
* AT+POWE
Get/Set RF transmit power
*
* AT+SLEEP
Sleep mode
*
* AT+ROLE
Get/Set current role.
*
* AT+PARI
Get/Set UART parity bit.
*
* AT+STOP
Get/Set UART stop bit.
*
* AT+START
System start working. *
* AT+IMME
System wait for command when power on.
*
* AT+IBEA
Switch iBeacon mode. *
* AT+IBE0
Set iBeacon UUID 0.
*
* AT+IBE1
Set iBeacon UUID 1.
*
* AT+IBE2
Set iBeacon UUID 2.
*
* AT+IBE3
Set iBeacon UUID 3.
*
* AT+MARJ
Set iBeacon MARJ .
*
* AT+MINO
Set iBeacon MINO .
*
* AT+MEA
Set iBeacon MEA .
*
* AT+NOTI
Notify connection event .
*
* AT+UUID
Get/Set system SERVER_UUID .
*
* AT+CHAR
Get/Set system CHAR_UUID .
*
*
-----------------------------------------------------------------*
* Note: (M) = The command support slave mode only.
*
* For more information, please visit http://www.cyobd.com
*
* Copyright@2013 www.cyobd.com. All rights
reserved.
*
********************************************************************
Change the name of a HM-10 4.0 BT-BLE Bluetooth-module with
an Arduino
First we need to connect the HM10-module to an Arduino.
Connect VCC to 3.3V on the Arduino and GND to GND, connect pin 6 to TXD and pin
7 to RXD on the Bluetooth-module.
So RX goes to TX and TX is connected to RX; “the wires are crossed”
The module has a default name like CC41-A. First we will change that name.
Load the following sketch into the Arduino Uno:
-------------------------
#include SoftwareSerial mySerial(6, 7); // RX, TX
// Connect HM10 Arduino
Uno
// Pin TXD
Pin 6
// Pin RXD
Pin 7
void setup() {
Serial.begin(9600);
// If the baudrate of the HM-10 module has been
updated,
// you may need to change 9600 by another value
// Once you have found the correct baudrate,
// you can update it using AT+BAUDx command
// e.g. AT+BAUD0 for 9600 bauds
mySerial.begin(9600);
}
void loop() {
char c;
if (Serial.available()) {
c = Serial.read();
mySerial.print(c);
}
if (mySerial.available()) {
c = mySerial.read();
Serial.print(c);
}
}
Start the serial monitor in the Arduino IDE.
Change right under in the monitor the LF&CR settings to “No line ending” and the
baud rate to 9600 Baud
Enter in the Serial monitor:
AT+RESET
AT+NAMEDevice01 (Or any other name you like to give
the module)
AT+RESET
The passkey of the module = 0000 when you pair the devices.
Cheap HM10 modules, bottom one, often lack a crystal but works fine too.

Android & IOS apps for communications
BLE UART serial communication apps for IOS and Android
Email
(2022-2023)
//
============================================================================================
/*
Connect the Bluetooth module GND and 5V and to pin
0 and 1 or 6 and 7 as noted in the comment of the digital pin assignment.
When connected to pin 0 and 1 two digital ports and
the SoftwareSerial library are saved. Also the Bluetooth subroutine can be
omitted.
This omission is accomplished by commenting out the
#define BLUETOOTHMOD with two slashes //
A disadvantage of connecting to pin 0 & 1 is that
upload to the Arduino when the Bluetooth module is connected is not possible
because the module
interferes the upload.
Author .: Ed Nieuwenhuys
Changes.: 0.0.1 Initial program
*/
//
============================================================================================
// //
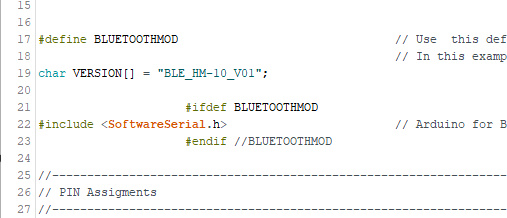
#define BLUETOOTHMOD // Use this define if
Bluetooth needs other pins than pin 0 and pin 1
// In this example the Bluetooth module is connected
to pin 6 and 7
char VERSION[] = "BLE_HM-10_V01";
#ifdef BLUETOOTHMOD
#include <SoftwareSerial.h> // Arduino for Bluetooth
communication
#endif //BLUETOOTHMOD
//------------------------------------------------------------------------------
// PIN Assignments
//------------------------------------------------------------------------------
enum DigitalPinAssignments { // Digital hardware
constants
RX = 0, // Optionally onnects to Bluetooth TX
TX = 1, // Optionally onnects to Bluetooth RX
PIN02 = 2, // Empty
PIN03 = 3, // Empty
PIN04 = 4, // Empty
PIN05 = 5, // Empty
BT_TX = 6, // Connects to Bluetooth RX
BT_RX = 7, // Connects to Bluetooth TX
PIN08 = 8, // Empty
PIN09 = 9, // Empty
PIN10 = 10, // Empty
PIN11 = 11, // Empty
PIN12 = 12, // Empty
secondsPin = 13, // LED on Arduino
};
enum AnaloguePinAssignments { // Analogue hardware
constants ----
EmptyA0 = 0, // Empty
EmptyA1 = 1, // Empty
EmptyA2 = 2, // Empty
EmptyA3 = 3, // Empty
SDA_pin = 4, // SDA pin
SCL_pin = 5, // SCL pin
EmptyA6 = 6, // Empty
EmptyA7 = 7}; // Empty
char sptext[100]; // For common print use
uint32_t msTick; // The number of millisecond ticks
since we last incremented the second counter
//------------------------------------------------------------------------------
// BLUETOOTH
//------------------------------------------------------------------------------
#ifdef BLUETOOTHMOD // Bluetooth ---------------------
SoftwareSerial Bluetooth(BT_RX, BT_TX); // BT_RX <=>
TXD on BT module, BT_TX <=> RXD on BT module
#endif //BLUETOOTHMOD
//------------------------------------------------------------------------------
// Menu
//------------------------------------------------------------------------------
//0 1 2 3 4 5
//12345678901234567890123456789012345678901234567890
char menu[][42] = { // menu[][nn] nn is largest length
of sentence in the menu
"Menu",
"A Action A",
"D Enter Date DDDMMYYYY (D25122021",
"I For this info menu",
"R Action R",
"T Enter time as THHMMSS (T071500)",
"Jan 2022" };
// ------------------------------------- End
Definitions ---------------------------------------
// //
//------------------------------------------------------------------------------
// ARDUINO Loop
//------------------------------------------------------------------------------
void loop()
{
InputDevicesCheck(); // Check for input from input
devices
EverySecondCheck(); // This subroutine is not
necessary but an example
}
//------------------------------------------------------------------------------
// ARDUINO Setup
//------------------------------------------------------------------------------
// //
void setup()
{
pinMode(secondsPin, OUTPUT );
Serial.begin(9600); // Setup the serial port to 9600
baud
Tekstprintln("\n*********\nSerial started");
#ifdef BLUETOOTHMOD
Bluetooth.begin(9600);
Tekstprintln("Bluetooth enabled");
#endif //BLUETOOTHMOD
}
//------------------------------------------------------------------------------
// Version info
//------------------------------------------------------------------------------
void SWversion(void)
{
unsigned int i;
PrintLine(40);
for (i = 0; i < sizeof(menu) / sizeof(menu[0]);
Tekstprintln(menu[i++]));
PrintLine(40);
}
void PrintLine(byte Lengte)
{
for (int n=0; n<Lengte; n++) {Serial.print(F("-"));}
Serial.println();
}
// //
//------------------------------------------------------------------------------
// Update routine done every second
//------------------------------------------------------------------------------
void EverySecondCheck(void)
{
uint32_t ms = millis() - msTick;
static bool Dpin; // Only write once to improve
program speed in the loop()
if (ms > 1 && Dpin) // With ms>5 LED is ON very short
time
{Dpin = LOW; digitalWrite(secondsPin,LOW);} // Turn
OFF the second on pin 13
if (ms > 999) // Every second enter the loop
{
msTick = millis();
digitalWrite(secondsPin,Dpin = HIGH); // Turn ON the
second on pin
}
}
//------------------------------------------------------------------------------
// Check for input from devices
// This fubction is called from with the loop()
//------------------------------------------------------------------------------
// //
void InputDevicesCheck(void)
{
SerialCheck();
#ifdef BLUETOOTHMOD
BluetoothCheck();
#endif //BLUETOOTHMOD
}
//------------------------------------------------------------------------------
// common print routines
//------------------------------------------------------------------------------
// //
void Tekstprint(char const *tekst)
{
Serial.print(tekst);
#ifdef BLUETOOTHMOD
Bluetooth.print(tekst);
#endif //BLUETOOTHMOD
}
void Tekstprintln(char const *tekst)
{
strcpy(sptext,tekst);
strcat(sptext,"\n"); //sprintf(sptext,"%s\n",tekst);
Tekstprint(sptext);
}
//------------------------------------------------------------------------------
// Check for serial input
//------------------------------------------------------------------------------
void SerialCheck(void)
{
String SerialString = "";
while (Serial.available())
{
char c = Serial.read(); delay(3);
if (c>31 && c<127) SerialString += c; // Allow input
from Space - Del
else c = 0;
}
if (SerialString.length()>0)
ReworkInputString(SerialString); // Rework ReworkInputString();
SerialString = "";
}
#ifdef BLUETOOTHMOD
//------------------------------------------------------------------------------
// Check for Bluetooth input
//------------------------------------------------------------------------------
void BluetoothCheck(void)
{
String BluetoothString = "";
char c = 0;
Bluetooth.listen(); // When using two software serial
ports, you have to switch ports by listen()ing on each one in turn.
while (Bluetooth.available())
{
c = Bluetooth.read();
Serial.print(c);
if (c>31 && c<127) BluetoothString += c;
else c = 0;
delay(3);
}
if (BluetoothString.length()>0)
{
ReworkInputString(BluetoothString); // Rework
ReworkInputString();
BluetoothString = "";
}
}
#endif //BLUETOOTHMOD
// //
//------------------------------------------------------------------------------
// Constrain a string with integers
// The value between the first and last character in a
string is returned between the low and up bounderies
//------------------------------------------------------------------------------
int SConstrainInt(String s,byte first,byte last,int
low,int up){return constrain(s.substring(first, last).toInt(), low, up);}
int SConstrainInt(String s,byte first, int low,int
up){return constrain(s.substring(first).toInt(), low, up);}
//------------------------------------------------------------------------------
// Input from Bluetooth or Serial
//------------------------------------------------------------------------------
// //
void ReworkInputString(String InputString)
{
InputString.trim(); // Remove trailing spaces
if (InputString.length()>10) return; // If string is
too long for some reason
if (InputString[0] > 64 && InputString[0] <123) // If
the first charater is a letter
{
sprintf(sptext,"**** Wrong entry ****"); // Default
message
Serial.println(InputString);
switch (InputString[0])
{
case 'A':
case 'a':
if (InputString.length() == 1)
{
sprintf(sptext,"Action A");
}
break;
case 'D':
case 'd':
if (InputString.length() == 9 )
{
int Day, Month, Year;
Day = (byte) SConstrainInt(InputString,1,3,0,31);
Month = (byte) SConstrainInt(InputString,3,5, 0, 12);
Year = SConstrainInt(InputString,5,9, 2000, 3000);
sprintf(sptext,"%02d-%02d-%04d",Day, Month, Year);
}
break;
case 'I':
case 'i':
if (InputString.length() == 1)
{
SWversion();
sptext[0] = 0; // Clear sptext
}
break;
case 'R':
case 'r':
if (InputString.length() == 1)
{
// Reset(); // Reset all settings
Tekstprintln("\n**** Reset to default settings ****");
}
break;
case 'T':
case 't':
if(InputString.length() >= 7) // T125500
{
int Hour, Minute, Second ;
Hour = (byte) SConstrainInt(InputString,1,3,0,23);
Minute = (byte) SConstrainInt(InputString,3,5,0,59);
Second = (byte) SConstrainInt(InputString,5,7,0,59);
sprintf(sptext,"%02d:%02d:%02d",Hour, Minute, Second);
}
break;
default:
break;
}
}
Tekstprintln(sptext);
InputString = "";
}